Nevron .NET Vision
Chart for .NET / User's Guide / Chart Types / Tree Map / Tree Map
In This Topic
    Tree Map
    In This Topic

    Tree maps display hierarchical (tree-structured) data as a set of nested rectangles. Each branch of the tree is given a rectangle, which is then tiled with smaller rectangles representing sub-branches. A leaf node's rectangle has an area proportional to a specified value versus the total aggregated value of all leaf nodes. Tree maps allow you to easily see patterns that would be difficult to spot in other ways, such as if a certain color is particularly relevant. A second advantage of tree maps is that, by construction, they make efficient use of space. As a result, they can legibly display thousands of items on the screen simultaneously.

     Creating a Tree Map

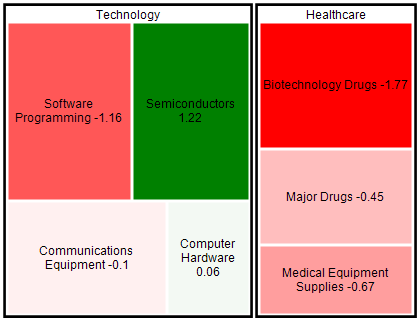
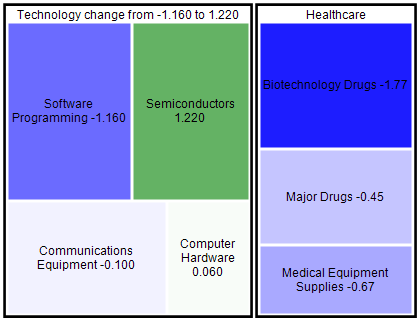
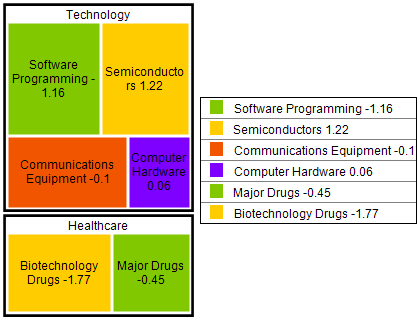
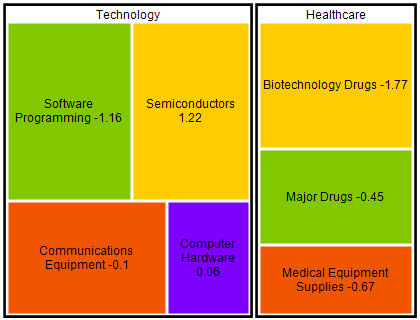
    You create a tree map chart by creating an instance of the NTreeMapChart class, which holds an instance to the tree map root node accessible from RootTreeMapNode property. The tree hierarchy is then created by adding instances of the NGroupTreeMapNode and NValueTreeMapNode classes that represent a collection of nodes and leaf node respectively. The following code shows how to create the simple tree map from the picture above:

    C#
    Copy Code

    // remove the default panels

    nChartControl1.Panels.Clear();

    nChartControl1.BackgroundStyle.FrameStyle.Visible = false;

    // create a tree map chart

    NTreeMapChart treeMapChart = new NTreeMapChart();

    treeMapChart.DockMode = PanelDockMode.Fill;

    nChartControl1.Panels.Add(treeMapChart);

    // add some group and value nodes

    NGroupTreeMapNode technologyNode = new NGroupTreeMapNode("Technology");

    technologyNode.Margins = new NMarginsL(2);

    technologyNode.StrokeStyle = new NStrokeStyle(2, Color.Black);

    treeMapChart.RootTreeMapNode.ChildNodes.Add(technologyNode);

    technologyNode.ChildNodes.Add(new NValueTreeMapNode(656.4, -1.16, "Software Programming", new NColorFillStyle(Color.FromArgb(129, 200, 0))));

    technologyNode.ChildNodes.Add(new NValueTreeMapNode(619.9, 1.22, "Semiconductors", new NColorFillStyle(Color.FromArgb(255, 204, 0))));

    technologyNode.ChildNodes.Add(new NValueTreeMapNode(535.9, -0.1, "Communications Equipment", new NColorFillStyle(Color.FromArgb(241, 85, 0))));

    technologyNode.ChildNodes.Add(new NValueTreeMapNode(277.1, 0.06, "Computer Hardware", new NColorFillStyle(Color.FromArgb(126, 0, 255))));

    NGroupTreeMapNode healthcareNode = new NGroupTreeMapNode("Healthcare");

    healthcareNode.Margins = new NMarginsL(2);

    healthcareNode.StrokeStyle = new NStrokeStyle(2, Color.Black);

    treeMapChart.RootTreeMapNode.ChildNodes.Add(healthcareNode);

    healthcareNode.ChildNodes.Add(new NValueTreeMapNode(446, -0.45, "Major Drugs", new NColorFillStyle(Color.FromArgb(129, 200, 0))));

    healthcareNode.ChildNodes.Add(new NValueTreeMapNode(593.3, -1.77, "Biotechnology Drugs", new NColorFillStyle(Color.FromArgb(255, 204, 0))));

    healthcareNode.ChildNodes.Add(new NValueTreeMapNode(325.4, -0.67, "Medical Equipment Supplies", new NColorFillStyle(Color.FromArgb(241, 85, 0))));

    Visual Basis
    Copy Code

    ' remove the default panels

    NChartControl1.Panels.Clear()

    NChartControl1.BackgroundStyle.FrameStyle.Visible = False

    NChartControl1.Width = 420

    NChartControl1.Height = 320

    ' create a tree map chart

    Dim treeMapChart As New NTreeMapChart()

    treeMapChart.DockMode = PanelDockMode.Fill

    NChartControl1.Panels.Add(treeMapChart)

    ' add some group and value nodes

    Dim technologyNode As New NGroupTreeMapNode("Technology")

    technologyNode.Margins = New NMarginsL(2)

    technologyNode.StrokeStyle = New NStrokeStyle(2, Color.Black)

    treeMapChart.RootTreeMapNode.ChildNodes.Add(technologyNode)

    technologyNode.ChildNodes.Add(New NValueTreeMapNode(656.4, -1.16, "Software Programming", New NColorFillStyle(Color.FromArgb(129, 200, 0))))

    technologyNode.ChildNodes.Add(New NValueTreeMapNode(619.9, 1.22, "Semiconductors", New NColorFillStyle(Color.FromArgb(255, 204, 0))))

    technologyNode.ChildNodes.Add(New NValueTreeMapNode(535.9, -0.1, "Communications Equipment", New NColorFillStyle(Color.FromArgb(241, 85, 0))))

    technologyNode.ChildNodes.Add(New NValueTreeMapNode(277.1, 0.06, "Computer Hardware", New NColorFillStyle(Color.FromArgb(126, 0, 255))))

    Dim healthcareNode As New NGroupTreeMapNode("Healthcare")

    healthcareNode.Margins = New NMarginsL(2)

    healthcareNode.StrokeStyle = New NStrokeStyle(2, Color.Black)

    treeMapChart.RootTreeMapNode.ChildNodes.Add(healthcareNode)

    healthcareNode.ChildNodes.Add(New NValueTreeMapNode(446, -0.45, "Major Drugs", New NColorFillStyle(Color.FromArgb(129, 200, 0))))

    healthcareNode.ChildNodes.Add(New NValueTreeMapNode(593.3, -1.77, "Biotechnology Drugs", New NColorFillStyle(Color.FromArgb(255, 204, 0))))

    healthcareNode.ChildNodes.Add(New NValueTreeMapNode(325.4, -0.67, "Medical Equipment Supplies", New NColorFillStyle(Color.FromArgb(241, 85, 0))))

     Tree Node Filling

    Each tree map node has a property called FillStyle that allows you to assign explicit fill to the node. If you do not assign a fill the node the tree map will automatically assign one using the following rules:

    1. If this is a value node then it will get the first available palette object from the ancestor chain of group nodes and assign a color that represents the value node's change value on that palette.

    2. If this is a group node then it does not assign a fill.

    To illustrate how this works consider that we don't specify explicit color to the nodes:

    C#
    Copy Code

    //...

    technologyNode.ChildNodes.Add(new NValueTreeMapNode(656.4, -1.16, "Software Programming"));

    technologyNode.ChildNodes.Add(new NValueTreeMapNode(619.9, 1.22, "Semiconductors"));

    technologyNode.ChildNodes.Add(new NValueTreeMapNode(535.9, -0.1, "Communications Equipment"));

    //...

    Visual Basic
    Copy Code

    '...

    technologyNode.ChildNodes.Add(New NValueTreeMapNode(656.4, -1.16, "Software Programming"))

    technologyNode.ChildNodes.Add(New NValueTreeMapNode(619.9, 1.22, "Semiconductors"))

    technologyNode.ChildNodes.Add(New NValueTreeMapNode(535.9, -0.1, "Communications Equipment"))

    '...

    Then the tree map will automatically compute a color for the node based on the palette properties assigned to the root tree map node. As a result the above tree map will now look like:

    The nodes with bigger positive change get colored in more intense shades of green, whereas the nodes with more negative change get colored in more intense shades of red. From the above picture it is clear that the change in "Semiconductors" was highly positive (relative to the other sectors) and the change in "Biotechnology Drugs" was highly negative. The palette settings are controlled from the palette object associated with the node parent group node. The following code shows how to create a custom palette:

    C#
    Copy Code

    treeMapChart.RootTreeMapNode.Palette.Mode = PaletteMode.Custom;

    treeMapChart.RootTreeMapNode.Palette.Clear();

    treeMapChart.RootTreeMapNode.Palette.Add(-2, Color.Blue);

    treeMapChart.RootTreeMapNode.Palette.Add(0, Color.White);

    treeMapChart.RootTreeMapNode.Palette.Add(2, Color.Green);

    Visual Basic
    Copy Code

    treeMapChart.RootTreeMapNode.Palette.Mode = PaletteMode.Custom

    treeMapChart.RootTreeMapNode.Palette.Clear()

    treeMapChart.RootTreeMapNode.Palette.Add(-2, Color.Blue)

    treeMapChart.RootTreeMapNode.Palette.Add(0, Color.White)

    treeMapChart.RootTreeMapNode.Palette.Add(2, Color.Green)

    This will produce the following tree map image:

     Tree Node Text

    The tree map node has a property called Format that defines the text that appears inside the tree map node rectangle. By default this property is set to "<label> <change>" for value nodes and "<label>" for group nodes, meaning that value nodes by default will display the node label followed by the formatted change value and group nodes will display the node label only (this is illustrated by the tree map pictures above. The following table shows the different formatting commands you can use in the Format property:

    Format Command Description
    label Applies to both value and group nodes. Replaces the command with the value of the Label property associated with the node.
    change Applies to value nodes only. Replaces the command with the formatted value of the Change property associated with the node.
    change_percent Applies to value nodes only. Replaces the command with the formatted percentage value of the Change property associated with the node.
    min_value Applies to group nodes only. Replaces the command with the formatted minimum value of its child nodes.
    max_value Applies to group nodes only. Replaces the command with the formatted maximum values of its child nodes.
    total_value Applies to group nodes only. Replaces the command with the formatted total sum of its child nodes values.
    min_change Applies to group nodes only. Replaces the command with the formatted minimum change value of its child nodes.
    max_change Applies to group nodes only. Replaces the command with the formatted maximum change value of its child nodes.
    min_change_percent Applies to group nodes only. Replaces the command with the formatted minimum percentage change value of its child nodes.
    max_change_percent Applies to group nodes only. Replaces the command with the formatted maximum percentage change of its child nodes.

    The following example shows how to apply a custom format to the technology group and change the way change values are formatted to triple decimal precision:

    C#
    Copy Code

    technologyNode.Format = "<label> change from <min_change> to <max_change>";

    technologyNode.ValueFormatter = new NNumericValueFormatter("0.000");

    Visual Basic
    Copy Code

    technologyNode.Format = "<label> change from <min_change> to <max_change>"

    technologyNode.ValueFormatter = New NNumericValueFormatter("0.000")

    The resulting tree map will look like:

    The text visualization properties of the tree map nodes such as font, style, font size etc. are controlled from the le LabelTextStyle property of the node. When set to null it means that the node style will use the LabelTextStyle property from the ancestor chain that is non null. This allows you to easily specify common label properties for all nodes in the tree. The following code snippet shows how to change the font / style of the technology group:

    C#
    Copy Code

    technologyNode.LabelTextStyle = new NTextStyle();

    technologyNode.LabelTextStyle.FontStyle.Name = "Verdana";

    technologyNode.LabelTextStyle.FontStyle.Style = FontStyle.Bold;

    technologyNode.ValueFormatter = new NNumericValueFormatter("0.000");

    Visual Basic
    Copy Code

    technologyNode.LabelTextStyle = New NTextStyle()

    technologyNode.LabelTextStyle.FontStyle.Name = "Verdana"

    technologyNode.LabelTextStyle.FontStyle.Style = FontStyle.Bold

    technologyNode.ValueFormatter = New NNumericValueFormatter("0.000")

     Tree Node Legend

    Each group tree map node can output information about itself or its descendants on a legend. This is controlled from the Legend property of the group tree map node. The following code shows how to create a tree map with associated legend:

    C#
    Copy Code

    // remove the default panels

    nChartControl1.Panels.Clear();

    nChartControl1.BackgroundStyle.FrameStyle.Visible = false;

    // legend

    NLegend legend = new NLegend();

    legend.DockMode = PanelDockMode.Right;

    legend.Margins = new NMarginsL(3);

    nChartControl1.Panels.Add(legend);

    // create a tree map chart

    NTreeMapChart treeMapChart = new NTreeMapChart();

    treeMapChart.DockMode = PanelDockMode.Fill;

    nChartControl1.Panels.Add(treeMapChart);

    treeMapChart.RootTreeMapNode.Legend.DisplayOnLegend = legend;

    treeMapChart.RootTreeMapNode.Legend.Mode = TreeMapNodeLegendMode.ValueNodes;

    // add some group and value nodes

    NGroupTreeMapNode technologyNode = new NGroupTreeMapNode("Technology");

    technologyNode.Margins = new NMarginsL(2);

    technologyNode.StrokeStyle = new NStrokeStyle(2, Color.Black);

    technologyNode.Legend.Mode = TreeMapNodeLegendMode.ValueNodes;

    treeMapChart.RootTreeMapNode.ChildNodes.Add(technologyNode);

    technologyNode.ChildNodes.Add(new NValueTreeMapNode(656.4, -1.16, "Software Programming", new NColorFillStyle(Color.FromArgb(129, 200, 0))));

    technologyNode.ChildNodes.Add(new NValueTreeMapNode(619.9, 1.22, "Semiconductors", new NColorFillStyle(Color.FromArgb(255, 204, 0))));

    technologyNode.ChildNodes.Add(new NValueTreeMapNode(535.9, -0.1, "Communications Equipment", new NColorFillStyle(Color.FromArgb(241, 85, 0))));

    technologyNode.ChildNodes.Add(new NValueTreeMapNode(277.1, 0.06, "Computer Hardware", new NColorFillStyle(Color.FromArgb(126, 0, 255))));

    NGroupTreeMapNode healthcareNode = new NGroupTreeMapNode("Healthcare");

    healthcareNode.Margins = new NMarginsL(2);

    healthcareNode.StrokeStyle = new NStrokeStyle(2, Color.Black);

    healthcareNode.Legend.Mode = TreeMapNodeLegendMode.ValueNodes;

    treeMapChart.RootTreeMapNode.ChildNodes.Add(healthcareNode);

    healthcareNode.ChildNodes.Add(new NValueTreeMapNode(446, -0.45, "Major Drugs", new NColorFillStyle(Color.FromArgb(129, 200, 0))));

    healthcareNode.ChildNodes.Add(new NValueTreeMapNode(593.3, -1.77, "Biotechnology Drugs", new NColorFillStyle(Color.FromArgb(255, 204, 0))));

    Visual Basic
    Copy Code

    ' remove the default panels

    NChartControl1.Panels.Clear()

    NChartControl1.BackgroundStyle.FrameStyle.Visible = False

    ' legend

    Dim legend As New NLegend()

    legend.DockMode = PanelDockMode.Right

    legend.Margins = New NMarginsL(3)

    NChartControl1.Panels.Add(legend)

    ' create a tree map chart

    Dim treeMapChart As New NTreeMapChart()

    treeMapChart.DockMode = PanelDockMode.Fill

    NChartControl1.Panels.Add(treeMapChart)

    treeMapChart.RootTreeMapNode.Legend.DisplayOnLegend = legend

    treeMapChart.RootTreeMapNode.Legend.Mode = TreeMapNodeLegendMode.ValueNodes

    ' add some group and value nodes

    Dim technologyNode As New NGroupTreeMapNode("Technology")

    technologyNode.Margins = New NMarginsL(2)

    technologyNode.StrokeStyle = New NStrokeStyle(2, Color.Black)

    technologyNode.Legend.Mode = TreeMapNodeLegendMode.ValueNodes

    treeMapChart.RootTreeMapNode.ChildNodes.Add(technologyNode)

    technologyNode.ChildNodes.Add(New NValueTreeMapNode(656.4, -1.16, "Software Programming", New NColorFillStyle(Color.FromArgb(129, 200, 0))))

    technologyNode.ChildNodes.Add(New NValueTreeMapNode(619.9, 1.22, "Semiconductors", New NColorFillStyle(Color.FromArgb(255, 204, 0))))

    technologyNode.ChildNodes.Add(New NValueTreeMapNode(535.9, -0.1, "Communications Equipment", New NColorFillStyle(Color.FromArgb(241, 85, 0))))

    technologyNode.ChildNodes.Add(New NValueTreeMapNode(277.1, 0.06, "Computer Hardware", New NColorFillStyle(Color.FromArgb(126, 0, 255))))

    Dim healthcareNode As New NGroupTreeMapNode("Healthcare")

    healthcareNode.Margins = New NMarginsL(2)

    healthcareNode.StrokeStyle = New NStrokeStyle(2, Color.Black)

    healthcareNode.Legend.Mode = TreeMapNodeLegendMode.ValueNodes

    treeMapChart.RootTreeMapNode.ChildNodes.Add(healthcareNode)

    healthcareNode.ChildNodes.Add(New NValueTreeMapNode(446, -0.45, "Major Drugs", New NColorFillStyle(Color.FromArgb(129, 200, 0))))

    healthcareNode.ChildNodes.Add(New NValueTreeMapNode(593.3, -1.77, "Biotechnology Drugs", New NColorFillStyle(Color.FromArgb(255, 204, 0))))

    From the above code you can see that the root group node and the "technology" and "Healthcare" group have a legend mode that tells them to export only value nodes. This results in the following automatically generated legend:

    The Legend object is similar to the series legend object with the exception of the Mode property which accepts values from the TreeMapLegendMode enum:

    TreeMapLegendMode Description
    None The node is not represented on the legend
    Group The node is represented on the legend by one entry
    ValueNodes The group node adds its child nodes to the legend
    GroupAndChildNodes Both group and value nodes are exported to the legend
    Palette The group node adds a palette to the legend
     Tree Node Box

    Each tree node has three properties called Margins, Padding and StrokeStyle that control the box generated by the node. The Margins property controls the left, top, right and bottom spacing applied to the box before the border (stroke) is drawn. The padding property controls the left, top, right and bottom spacing of the box content area from the border (stroke). The following code snippets show how to apply margins, stroke and padding:

    C#
    Copy Code
    treeMapNode.Margins = new NMarginsL(5);
    treeMapNode.Padding = new NMarginsL(5);
    treeMapNode.StrokeStyle = new NStrokeStyle(2, Color.Green);
    Visual Basic
    Copy Code
    treeMapNode.Margins = New NMarginsL(5)
    treeMapNode.Padding = New NMarginsL(5)
    treeMapNode.StrokeStyle = New NStrokeStyle(2, Color.Green)
     Label Fit Modes

    The tree map node has a property called LabelFitModes that controls how labels inside the box are fitted inside the node content area. The following table lists the options of the TreeMapNodeLabelFitMode enum:

    TreeMapNodeLabelFitMode Description
    Hide Automatically hides the label if its size exceeds the size of node. Always succeeds.
    Wrap Wraps the label if its size exceeds the size of the node. Always succeeds.
    Trim Trims the label if its size exceeds the size of the node. Always succeeds.
    AutoScale Automatically scales the label so that it fits the bounds of the node. Will succeed if the computed scale factor is bigger than MinAutoScale.

    You can specify one of or more label fit modes as shown in the following example:

    C#
    Copy Code

    treeMapNode.LabelFitModes = new TreeMapNodeLabelFitMode[] { TreeMapNodeLabelFitMode.AutoScale, TreeMapNodeLabelFitMode.Hide };

    treeMapNode.MinAutoScale = 0.5;

    Visual Basic
    Copy Code
    treeMapNode.LabelFitModes = New TreeMapNodeLabelFitMode() {TreeMapNodeLabelFitMode.AutoScale, TreeMapNodeLabelFitMode.Hide}
    treeMapNode.MinAutoScale = 0.5

    The above code will instruct the node to auto scale labels that don't fit. If the computed auto scaling factor is below 0.5 (e.g. the font size needed to display the labeldrops more than a half) the label will be hidden.

     Interactivity

    The tree map node has an interactivity style object which allows you to associate tooltip, cursor, etc. to the node. It is accessible from the the InteractivityStyle property:

    C#
    Copy Code

    treeMapNode.InteractivityStyle = new NInteractivityStyle("Treemap nodes can have tooltips");

    Visual Basic
    Copy Code

    treeMapNode.InteractivityStyle = new NInteractivityStyle("Treemap nodes can have tooltips")

     Related Examples

    Windows forms: Chart Gallery\Tree Map\

    Wpf: Chart Gallery\Tree Map\

    Web Forms: Chart Gallery\Tree Map\


    See Also