In order to perform custom measuring you should set the OwnMeasure property of a NCommand object to true and hook to the Measure notification.
The following example demonstrates how to custom paint a command:
| C# |
Copy Code
|
|---|---|
//create a toolbar with one hosted command NToolbar toolbar = new NToolbar(); toolbar.DefaultCommandStyle = CommandStyle.Text; //create a command and perform our custom measuring upon it NCommand command = new NCommand(); command.OwnMeasure = true; command.Measure += new MeasureCommandEventHandler(OnMeasureCommand); ... private void OnMeasureCommand(object sender, MeasureCommandEventArgs e) { NCommand comm = e.Command; Graphics g = e.Graphics; string text = comm.Properties.Text; Size sz = g.MeasureString(text, toolbar.Font, 200, comm.Renderer.StringFormat).ToSize(); //set the desired size and do not forget to specify the text size //which is used to properly calculate rectangle to draw text into e.Size = new Size(sz.Width + 20, sz.Height + 20); e.TextSize = sz; } |
|
| Visual Basic |
Copy Code
|
|---|---|
'create a toolbar with one hosted command Dim toolbar As NToolbar = New NToolbar() toolbar.DefaultCommandStyle = CommandStyle.Text 'create a command and perform our custom measuring upon it Dim command As NCommand = New NCommand() command.OwnMeasure = True AddHandler command.Measure, AddressOf OnMeasureCommand ... Private Sub OnMeasureCommand(ByVal sender As Object, ByVal e As MeasureCommandEventArgs) Handles command.Measure Dim comm As NCommand = e.Command Dim g As Graphics = e.Graphics Dim text As String = comm.Properties.Text Dim sz As Size = g.MeasureString(text, toolbar.Font, 200, comm.Renderer.StringFormat).ToSize() 'set the desired size and do not forget to specify the text size 'which is used to properly calculate rectangle to draw text into e.Size = New Size(sz.Width + 20, sz.Height + 20) e.TextSize = sz End Sub |
|
The result of our custom measuring - command's size is a little larger than the default one.
In order to perform custom painting you should set the OwnPaint property of a NCommand object to true and hook to the Paint notification.
The following example demonstrates how to custom paint a command:
| C# |
Copy Code
|
|---|---|
//create a toolbar object to host a command NToolbar toolbar = new NToolbar(); toolbar.DefaultCommandStyle = CommandStyle.Text; //create a command and hook to its paint method NCommand command = new NCommand(); //specify this to make sure the Paint event will be fired command.OwnPaint = true; comm.Paint += new DrawCommandEventHandler(OnCommandPaint); toolbar.Commands.Add(command); ... private void OnCommandPaint(object sender, DrawCommandEventArgs e) { NCommand comm = e.Command; //each command knows its renderer NCommandRenderer renderer = comm.Renderer as NCommandRenderer; Graphics g = e.Graphics; NCommandState visualState = comm.VisualState; Rectangle bounds = visualState.Bounds; bounds.Width -= 1; bounds.Height -= 1; //draw custom background and border CommandState state = visualState.State; //use the cashed Brush and Pen from the renderer SolidBrush brush = renderer.Brush; Pen pen = renderer.Pen; switch(state) { case CommandState.Default: break; case CommandState.DroppedDown: break; case CommandState.Hovered: brush.Color = Color.White; g.FillRectangle(brush, bounds); NUIRenderer.DrawBorder3D(g, bounds, BorderStyle3D.Raised, SystemColors.Control, SystemColors.Control); break; case CommandState.Pushed: brush.Color = Color.Yellow; g.FillRectangle(brush, bounds); NUIRenderer.DrawBorder3D(g, bounds, BorderStyle3D.Sunken, SystemColors.Control, SystemColors.Control); break; } //draw default text renderer.DrawText(comm, g); } |
|

The result of the code above: the command appearance in hovered and pressed state.
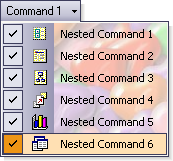
As a menu window is created on demand whenever a NCommand needs to visualize its children commands, it is the command itself that stores information about how the menu is visualized. This information is exposed via the MenuOptions property of its Properties one.
The following example demonstrates how to customize child menu appearance:
| C# |
Copy Code
|
|---|---|
//create new command NCommand command = new NCommand(); //specify menu options command.Properties.MenuOptions.BackgroundImageInfo.Image = Image.FromFile("path/to/my/image.png"); command.Properties.MenuOptions.BackgroundImageInfo.DrawMode = ImageDrawMode.Tile; command.Properties.MenuOptions.BackgroundImageInfo.Alpha = 0.3f; command.Properties.MenuOptions.ImageAndCheck = true; NCommand nested; //add 6 nested commands for(int i = 1; i < 7; i++) { nested = new NCommand(); nested.Properties.Text = "Nested Command " + i.ToString(); nested.Checked = true; command.Commands.Add(nested); } |
|

This is the result of the above code.
The child menu displayed by a NCommand can be an entirely custom control, which inherits from NMenuWindow. Every NMenuWindow instance is created via a command's <ref>CreateMenu</ref> method. So you may extend the instance itself by directly overriding this method. Or you may use yet another option - specify the type of the menu you prefer to use by simply providing valid MenuWindowType which will be used every time the command creates a menu window instance.
The following example demonstrates how to provide custom menu type:
| C# |
Copy Code
|
|---|---|
//create a command NCommand command = new NCommand(); //specify custom menu type command.Properties.MenuWindowType = typeof(MyCustomMenuWindow); |
|
Screenshot of a custom region menu from the ExampleLauncher application.