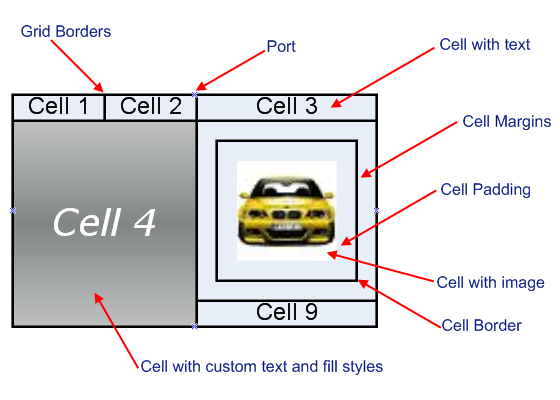
The table shape is composed of cells. Each cell is a styleable diagram element and may also have borders (left, right, top, bottom or any combination of them), margins, padding, text and image. The cells are auto sized to fit their contents. You can change the contents of a cell by using its Text and Bitmap properties. The Margins and the Padding properties control the offset of the cell border from the grid border and the offset of the cell content from the cell border, respectively. There are scenarios in which you will want a cell to occupy several rows and columns. In such cases you can take advantage of the RowSpan and ColumnSpan properties thus specifying how many rows and columns the cell must occupy. When creating a table shape you should initialize it with the proper number of cells using the InitTable method. You can also add or insert rows to the table later by using the InsertRowAt method.
Besides cells, the table shape has a columns collection, too. Each column is auto sized by default, but if you set SizeMode to Fixed, and specify a value for the Width property, the column will be as wide as the value specified. The table shape provides some global properties for controlling the appearance of all of its cells. Such properties are:
- CellMargins and CellPadding - set the margins and the padding properties of all cells in the table to the specified values
- GridVisible - determines whether to render the grid in which the cells are placed or not
- PortDistributionMode - determines the way the ports are distributed along the table shape. The possible choices are shape based, grid based and cell based distribution
Let’s see how easy it is to create the shape presented in the previous chapter:
- Create an instance of the NTableShape class, add it to the drawing document and initialize it with the proper number of cells (in our case 3 x 3 cells are needed):
| C# |
Copy Code
|
NTableShape shape = new NTableShape(400, 400, 100, 100);
nDrawingDocument1.ActiveLayer.AddChild(shape);
shape.InitTable(3, 3);
|
| Visual Basic |
Copy Code
|
Dim shape As NTableShape  = New NTableShape(400, 400, 100, 100)
nDrawingDocument1.ActiveLayer.AddChild(shape)
shape.InitTable(3, 3)
|
- Start the table shape update process by calling the BeginUpdate method.
Important: always call this method when you need to change more than one property of the table and its cells because it will suppress the auto sizing of the table until the EndUpdate method is called and thus you will experience a significant performance gain:
| C# |
Copy Code
|
shape.BeginUpdate();
|
| Visual Basic |
Copy Code
|
shape.BeginUpdate();
|
- Write some code to set the text of the cells. You access a cell by specifying its column and row index to the indexer of the table shape object:
| C# |
Copy Code
|
int i, j;
int rowCount = shape.RowCount;
int columnCount = shape.ColumnCount;
for (i = 0; i < rowCount; i++)
{
    for (j = 0; j < columnCount; j++)
    {
        shape[j, i].Text = string.Format("Cell {0}", i * columnCount + j + 1);
    }
}
|
| Visual Baisc |
Copy Code
|
Dim i As Integer
Dim j As Integer
Dim rowCount As Integer = shape.RowCount
Dim columnCount As Integer = shape.ColumnCount
For i As Integer = 0 To rowCount - 1 Step 1
    For j As Integer = 0 To columnCount - 1 Step 1
        shape(j, i).Text = String.Format("Cell {0}", i * columnCount + j + 1)
    Next
Next
|
- Create a style sheet for Cell 4 and make it span 2 rows and 2 columns:
| C# |
Copy Code
|
NStyleSheet style1 = new NStyleSheet("style1");
NStyle.SetFillStyle(style1, new NGradientFillStyle(GradientStyle.Horizontal, GradientVariant.Variant3, Color.FromArgb(192, 194, 194), Color.FromArgb(129, 133, 133)));
NStyle.SetStrokeStyle(style1, new NStrokeStyle(1, Color.FromArgb(68, 90, 108)));
NStyle.SetTextStyle(style1, new NTextStyle(new Font("Verdana", 14, FontStyle.Italic), Color.White));
nDrawingDocument1.StyleSheets.AddChild(style1);

shape[0, 1].StyleSheetName = "style1";
shape[0, 1].ColumnSpan = 2;
shape[0, 1].RowSpan = 2;
|
| Visual Basic |
Copy Code
|
Dim style1 As NStyleSheet = New NStyleSheet("style1")
NStyle.SetFillStyle(style1, New NGradientFillStyle(GradientStyle.Horizontal, GradientVariant.Variant3, Color.FromArgb(192, 194, 194), Color.FromArgb(129, 133, 133)))
NStyle.SetStrokeStyle(style1, New NStrokeStyle(1, Color.FromArgb(68, 90, 108)))
NStyle.SetTextStyle(style1, New NTextStyle(New Font("Verdana", 14, FontStyle.Italic), Color.White))
nDrawingDocument1.StyleSheets.AddChild(style1)

shape(0, 1).StyleSheetName = "style1"
shape(0, 1).ColumnSpan = 2
shape(0, 1).RowSpan = 2
|
- Set the image, the margins, the padding and the borders of Cell 9:
| C# |
Copy Code
|
shape[2, 1].Text = string.Empty;
shape[2, 1].Bitmap = new Bitmap(@"D:\car.jpg");
shape[2, 1].Borders = TableCellBorder.All;
shape[2, 1].Margins = new Nevron.Diagram.NMargins(10);
shape[2, 1].Padding = new Nevron.Diagram.NMargins(10);
|
| Visual Basic |
Copy Code
|
shape(2, 1).Text = String.Empty
shape(2, 1).Bitmap = New Bitmap(@"D:\car.jpg")
shape(2, 1).Borders = TableCellBorder.All
shape(2, 1).Margins = New Nevron.Diagram.NMargins(10)
shape(2, 1).Padding = New Nevron.Diagram.NMargins(10)
|
- Finally, do not forget to call the EndUpdate method which will resume the table shape autosizing feature and will also immediately resize the table shape to fit its contents:
| C# |
Copy Code
|
shape.EndUpdate();
|
| Visual Basic |
Copy Code
|
shape.EndUpdate()
|